

Ever feel like managing your money is a constant uphill battle? This video shows you how to create a budget excel sheet that updates itself. You’ll see exactly how much you have left to spend in each category, and it even adds new months automatically. Best of all, you can set it all up in about 15 minutes, making it a quick guide on how to create a budget excel.
Key Takeaways
- Create a transaction tracker with automatic running balance.
- Automatically add new months based on the date entered.
- Automate tracking of your spending and income progress.
- See how much money is left in each budget category.
- Build the entire tracker in 10-15 minutes.
Step 1: Setting Up Your Transaction Table for Your Excel Budget
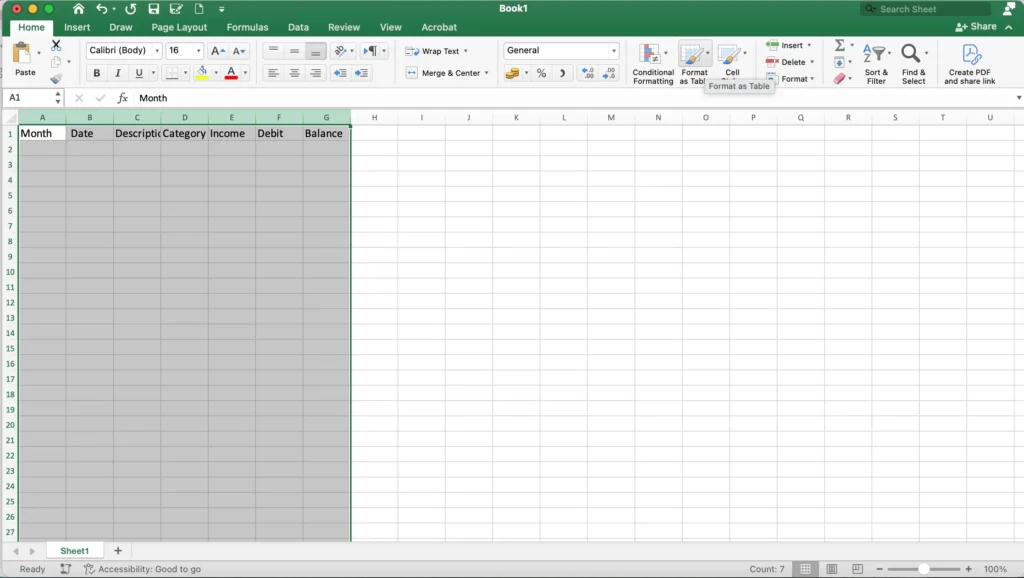
First things first, we need to set up a table to log all your financial comings and goings. You’ll want to add some headers to start. I like to include:
- Month
- Date
- Description (what the transaction was for)
- Category (like groceries, mortgage, etc.)
- Income
- Debit (expenses)
- Running Balance
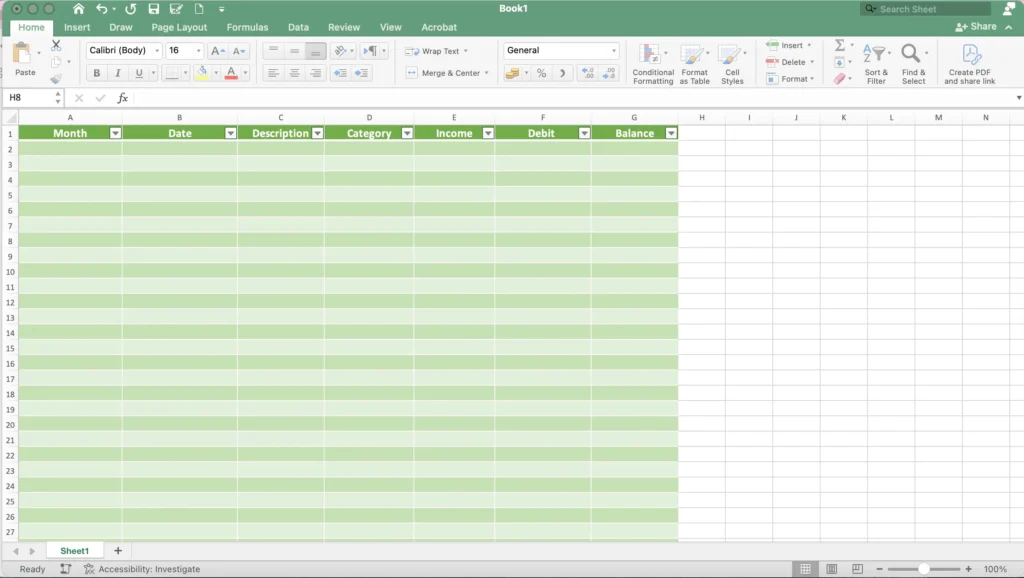
Once you have your headers, highlight them and the rows below. Then, go to the ‘Home’ tab and select ‘Format as Table’. Pick a color you like – green works well for budgets. Just make sure the ‘My table has headers’ box is checked in the pop-up. Adjust the column widths so everything fits nicely. This is a crucial step in learning how to create a budget excel.
Step 2: Add Formulas and Formatting to Your Excel Budget
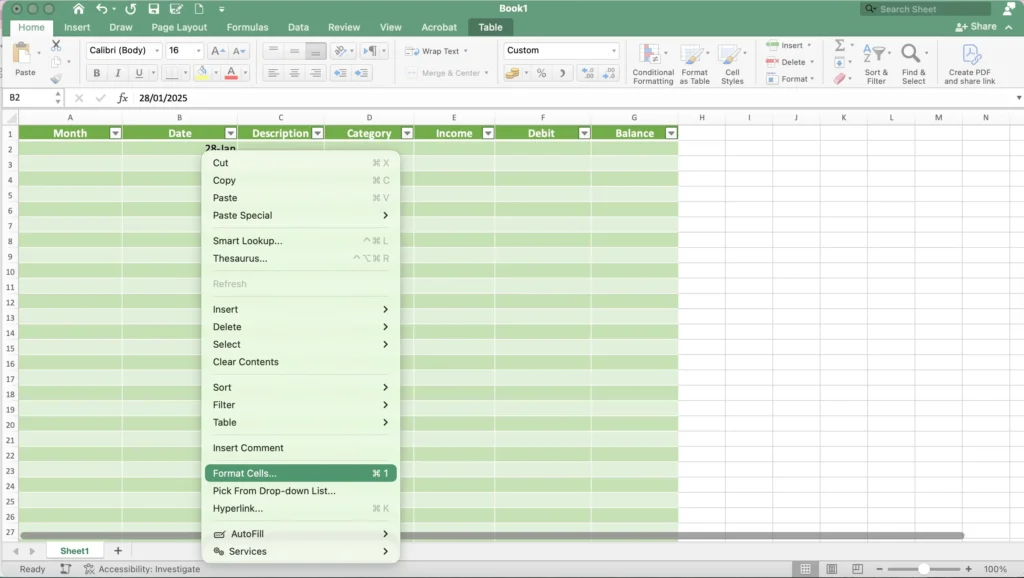
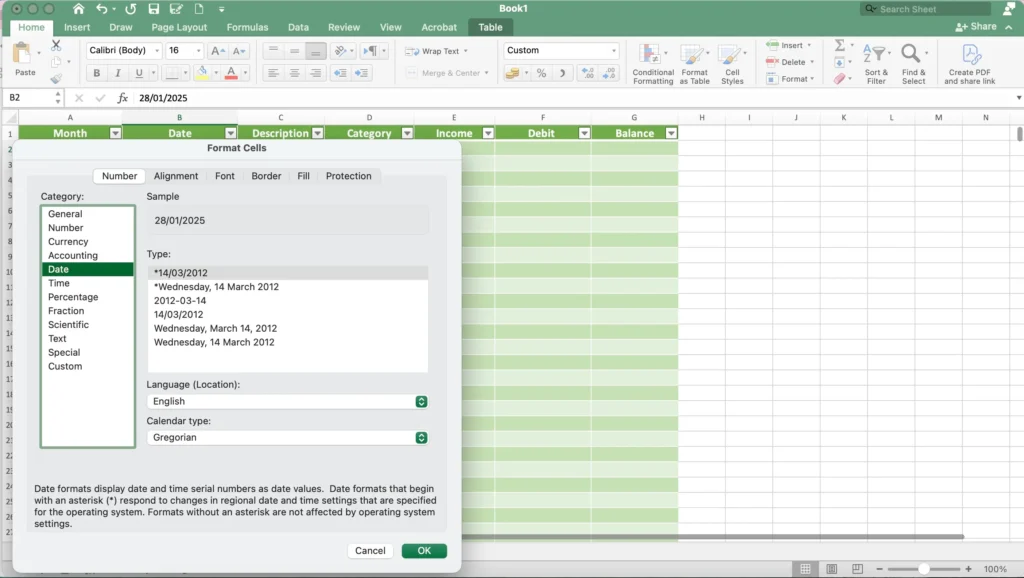
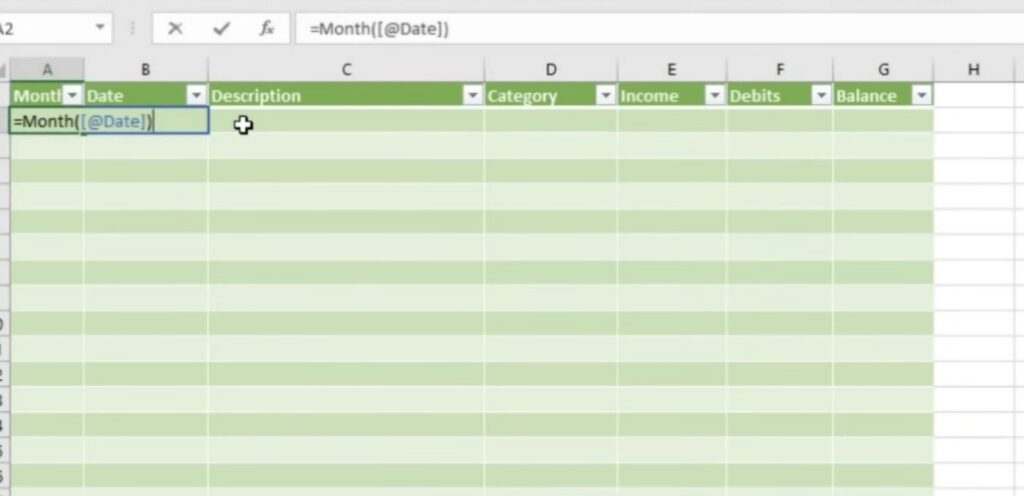
Now, let’s make this table do some work for us. We’ll start by adding a starting date. Highlight column B (where your dates will go), right-click, and choose ‘Format Cells’. Go to the ‘Number’ tab, select ‘Date’, and pick a format you prefer.
In column A, we’ll add a formula to pull just the month number from the date. Type =MONTH(B2) into cell A2 and hit enter. Since it’s part of a table, it should automatically fill down. This formula will grab the month number from whatever date you enter in column B.
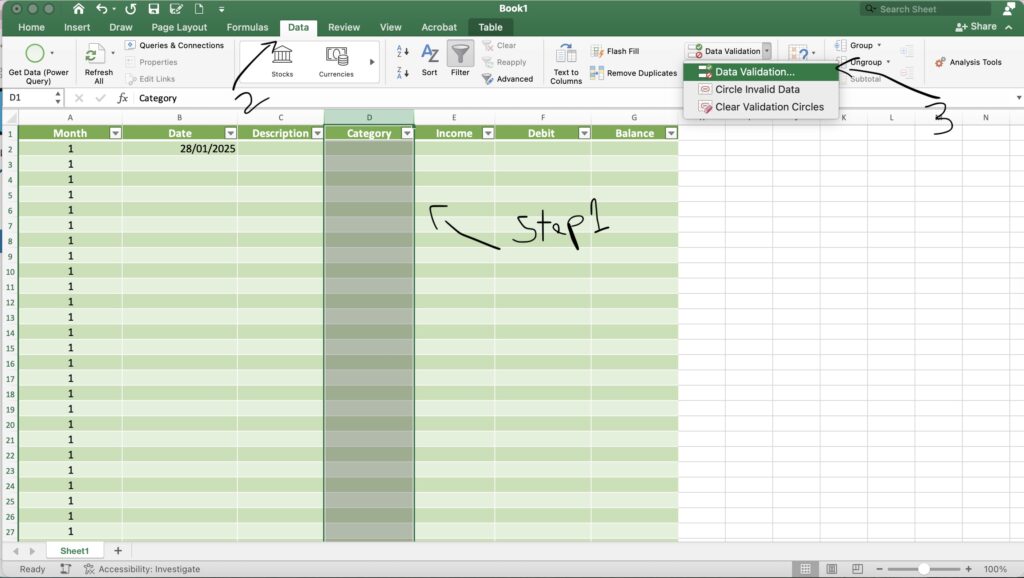
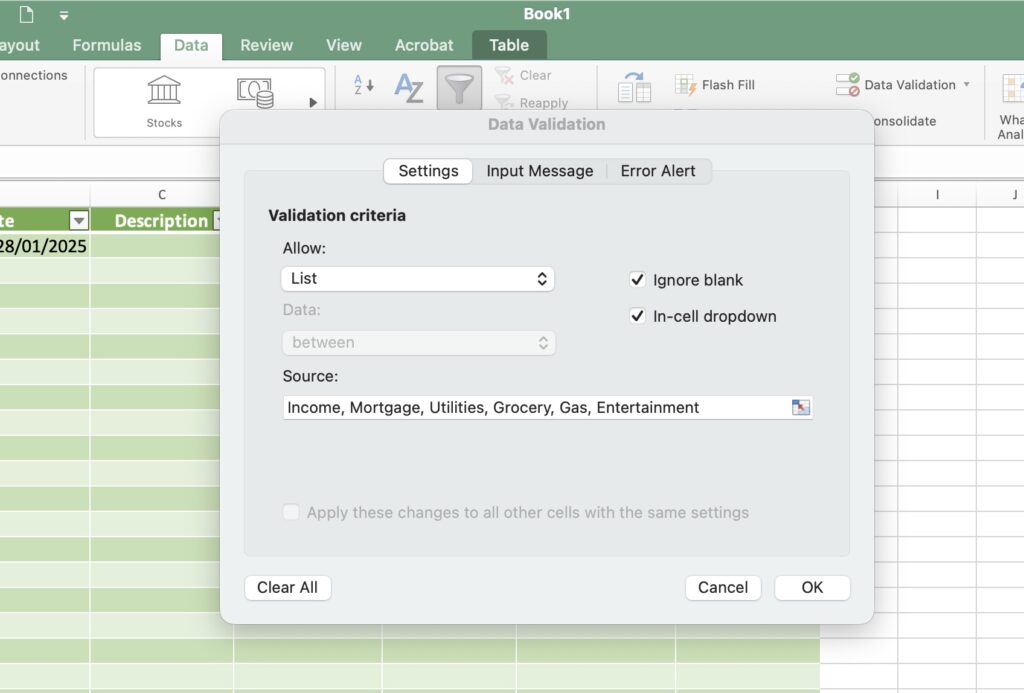
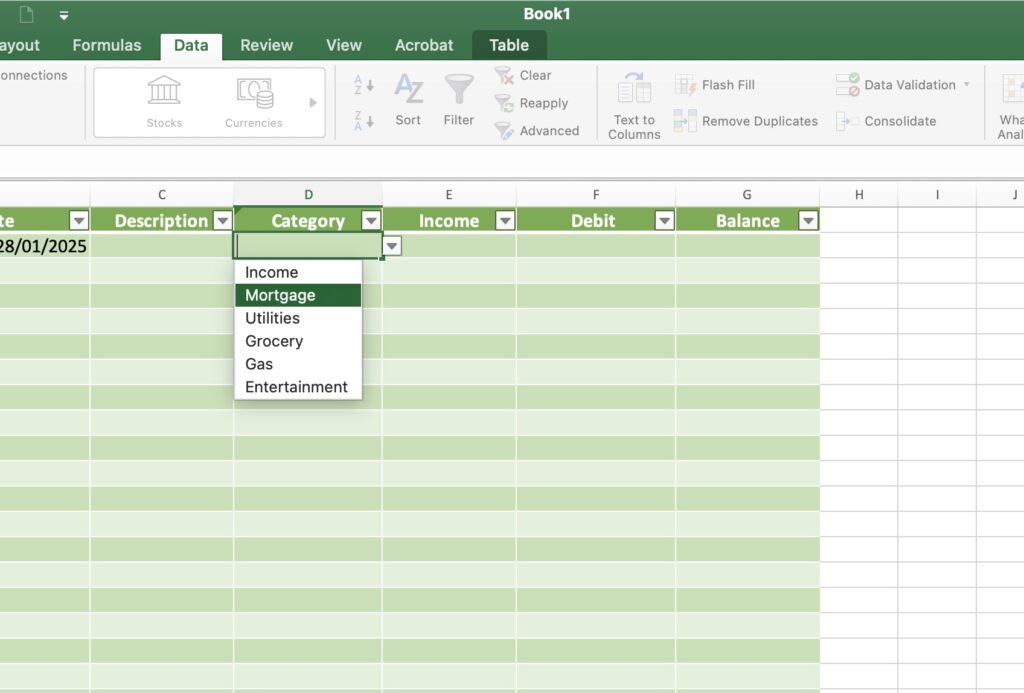
Next, we’ll create drop-down lists for the ‘Category’ column (column D). Highlight column D, but hold down ‘Ctrl’ and unselect the header row. Go to the ‘Data’ tab and click ‘Data Validation’. In the pop-up, choose ‘List’ from the ‘Allow’ drop-down. In the ‘Source’ box, type your categories, separated by commas (e.g., Income, Mortgage, Utilities, Grocery, Gas, Entertainment).
Finally, format columns E, F, and G (Income, Debit, and Running Balance) as currency. Highlight these columns, go to the ‘Home’ tab, and click the dollar sign icon. This formatting is key for a professional-looking how to create a budget excel document.
Step 3: Calculate Your Running Balance in Excel
To get a running balance, we’ll do this in two steps. First, type your starting balance directly into cell G2. Then, in cell G3, enter the formula: =SUM(G2, E3, -F3). This takes the previous balance, adds any income from that row, and subtracts any expenses.
When you hit enter, you might see an ‘Autofill Options’ pop-up. Don’t click ‘Autofill’. Instead, copy the formula from G3. Select all of column G, then hold ‘Ctrl’ and unselect the header and your starting balance cell (G2). Paste the formula (Ctrl+V). Now, as you add income or expenses, your running balance will update automatically. This dynamic update is a core feature of how to create a budget excel that works for you.
Step 4: Track Your Progress with Visuals in Your Excel Budget
This is where it gets really cool. We’ll add progress bars to see how much you’ve spent or how much income you still need. First, list the categories you want to track in column I. In cell J1, type the month you want to focus on (e.g., ‘January’). In cell J2, you’ll use a SUMIFS formula to add up income for that month and category. The formula looks like this: =SUMIFS(E:E, A:A, $J$1, D:D, I2).
For expenses, the formula is similar: =SUMIFS(F:F, A:A, $J$1, D:D, I3). Make sure to adjust the criteria ranges and cells as needed. You might need to press F4 on the month cell reference ($J$1) to make it absolute so it doesn’t change when you drag the formula down.
Once you have your totals, select the cell with the income total. Go to ‘Conditional Formatting’ on the ‘Home’ tab, choose ‘Data Bars’, and pick a green bar. For expenses, use red bars.
To make these bars more meaningful, go back to ‘Conditional Formatting’ and select ‘Manage Rules’. Double-click your rule. Set the ‘Minimum’ to 0 and the ‘Maximum’ to your budgeted amount for that category. For example, if you budget $4,000 for income, set the maximum to 4000. Do the same for expenses, setting the maximum to your budgeted amount for each.

Now, your bars will visually show you how close you are to your budget limits. If you change the month in cell J1, the progress bars will reset for the new month, showing you the progress for that specific month. This visual feedback is essential when mastering how to create a budget excel.
Here s a free templates for budgeting templates in excel
Step 5: Make Your Excel Budget Look Good
Finally, you can clean up the look. Center the month, add borders, and adjust spacing to make it visually appealing. The best part is that when you switch months, everything updates automatically, giving you a clear picture of your finances for the current month. This completes our guide on how to create a budget excel.
Read More: How to Maximize Your PR Budget: Startup Strategies That Work